
- Buffering is usually caused by unstable upload speeds, not download speeds.
- Using a Constant Bitrate (CBR) in OBS Studio is mandatory for YouTube Live stability.
- Hardware encoding (like NVENC AV1) drastically reduces CPU overload and dropped frames.
- Switching from Ultra-Low to Normal latency in YouTube Control Room builds a buffer to prevent viewer-side lag.
- Wired Ethernet connections remain vastly superior to Wi-Fi 6/7 for sustained live broadcasting.
There is nothing more frustrating for a creator than going live, gaining momentum in the chat, and suddenly seeing the dreaded 'Stream Health: Poor' notification. If your YouTube live stream keeps buffering, you are actively losing viewers, tanking your session time, and hurting your channel's algorithmic reach. In 2026, audience tolerance for lag is practically zero.
The root cause of a buffering stream usually falls into one of three categories: local network instability (specifically upload jitter), encoder overload in software like OBS Studio, or misconfigured YouTube Live Control Room settings. While it’s easy to blame your ISP or YouTube's servers, the reality is that 90% of buffering issues can be permanently resolved on the creator's end with a few specific tweaks.
In this comprehensive guide, we will break down exactly why your broadcast is dropping frames and provide concrete, step-by-step solutions to fix it. From optimizing your OBS bitrate for 2026 standards to configuring YouTube's latency settings and troubleshooting hardware bottlenecks, these are the exact expert methods used by top-tier InstantViews creators to maintain flawless, 24/7 stream stability.
- 1. Understanding Why Your YouTube Live Stream Keeps Buffering
- 2. Network Diagnostics and Fixing Local Bandwidth Issues
- 3. Optimizing Encoder Settings in OBS Studio
- 4. Adjusting Resolution and Framerate for Stability
- 5. Hardware Acceleration and CPU/GPU Overload
- 6. YouTube Live Control Room Settings
- 7. Clearing Cache and Background App Interference
- 8. Fixing Network Drops with YouTube's Backup Stream Feature
- 9. Upgrading Your Gear for 2026 Streaming Standards
- 10. Advanced Fixes: DNS Flushing, VPNs, and ISP Routing
- FAQ
1. Understanding Why Your YouTube Live Stream Keeps Buffering
Buffering happens when your computer fails to send video data to YouTube's ingest servers at a consistent rate, causing the video player to pause while it waits for the next chunk of data.

Before we dive into the technical fixes, it is crucial to understand the mechanics of live broadcasting in 2026. When you hit 'Start Streaming,' your encoding software (like OBS or Streamlabs) compresses your video and audio into data packets. These packets are sent over your local network, through your Internet Service Provider (ISP), and finally to YouTube's RTMP or HLS ingest servers. If your YouTube live stream keeps buffering, a bottleneck is occurring somewhere along this pipeline.
The most common culprit is upload instability, known as jitter. Unlike downloading a file, live streaming requires a continuous, uninterrupted stream of data. If your upload speed fluctuates dramatically, YouTube's servers don't receive the data in time, forcing the viewer's video player to pause and buffer. This is why you might have a 100 Mbps upload speed on a speed test, but still experience dropped frames during a live broadcast.
Speed tests measure peak upload bandwidth, not connection stability. A stable 10 Mbps connection is vastly superior for streaming than a fluctuating 50 Mbps connection.
Another major factor is hardware overload. If your computer's CPU or GPU is maxed out rendering a game and encoding the stream simultaneously, it will fail to process the video frames in time. This results in 'Encoding Overloaded' errors, which look identical to network buffering on the viewer's end. By isolating whether your issue is network-based or hardware-based, you can apply the exact fixes outlined in the following sections to guarantee a smooth broadcast.
2. Network Diagnostics and Fixing Local Bandwidth Issues
When your YouTube live stream keeps buffering, the very first place to look is your local network. Many creators mistakenly rely on Wi-Fi for live streaming. Even with the advent of Wi-Fi 7 in 2026, wireless connections are inherently susceptible to packet loss and interference from other devices, walls, and overlapping signals. For a rock-solid stream, a physical connection is non-negotiable.
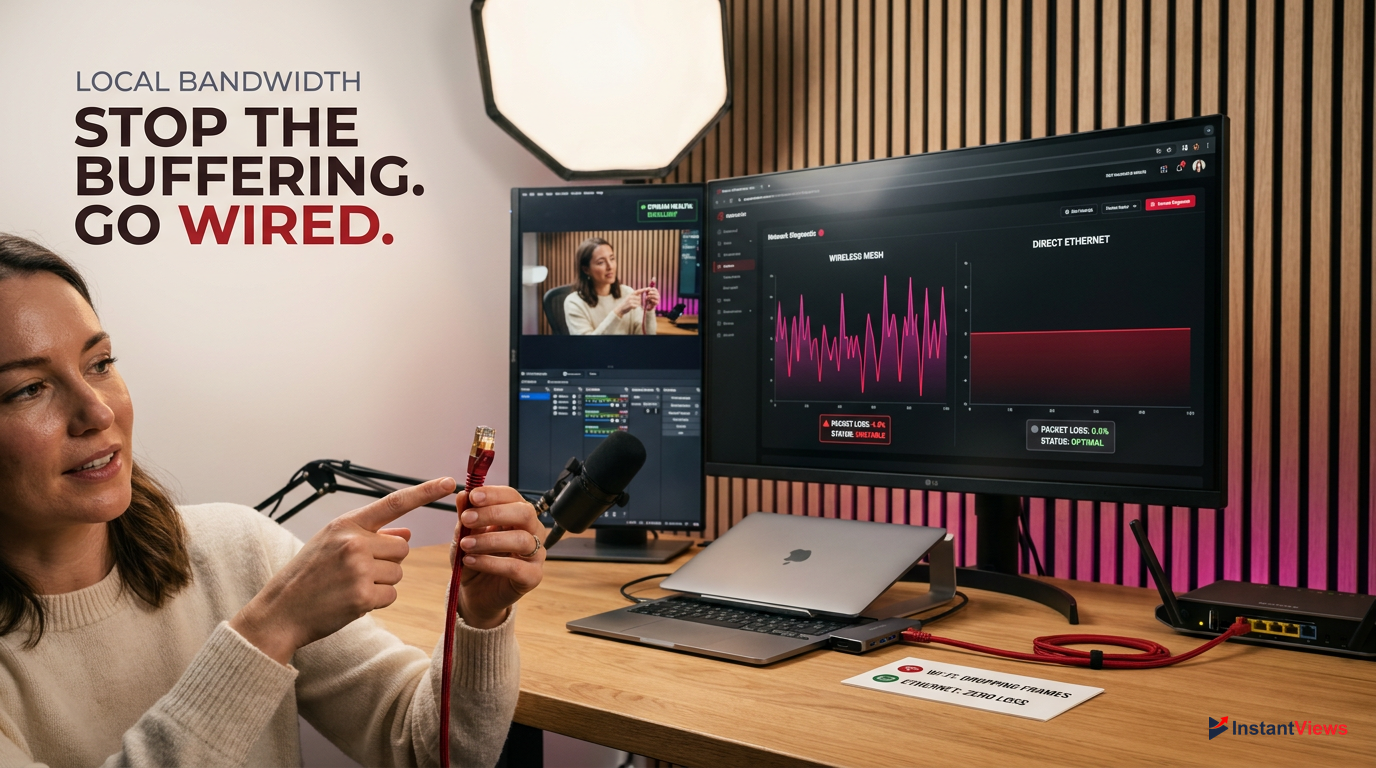
Never stream over a wireless mesh network if you can avoid it. The wireless backhaul between nodes introduces micro-stutters that will ruin your RTMP connection to YouTube.
If you are already wired and still dropping frames, you need to test for packet loss and bufferbloat. Standard speed tests are insufficient. Instead, use a tool like Packetlosstest.com and set it to the '720p/1080p Stream' preset. If your packet loss is above 0.5%, your ISP is dropping the ball, or your router is failing to prioritize your streaming traffic.
| Connection Type | Packet Loss Risk | Streaming Reliability |
|---|---|---|
| Cat6 Ethernet | Near 0% | Excellent |
| MoCA Adapter | < 0.1% | Great |
| Wi-Fi 7 (6GHz) | 1 - 3% | Moderate |
| Wi-Fi 5 (5GHz) | 3 - 5%+ | Poor |
To immediately stabilize your local network, you should flush your router's cache and prioritize your streaming PC using Quality of Service (QoS) settings. Here is the standard protocol for resetting your network connection to clear out IP conflicts that cause upload throttling.
Power Cycle Your Modem and Router
Unplug both devices from the wall. Wait a full 60 seconds (not 10 seconds) to allow the capacitors to drain completely. Plug the modem in first, wait for the online light, then plug in the router.
Enable QoS in Router Settings
Log into your router's admin panel (usually 192.168.1.1). Navigate to Advanced > QoS Setup. Add your streaming PC's MAC address and set its priority to 'Highest' or 'Gaming/Streaming'.
Update Network Adapter Drivers
Open Windows Device Manager, expand 'Network adapters', right-click your Ethernet controller, and select 'Update driver'. Choose 'Search automatically for drivers'.
3. Optimizing Encoder Settings in OBS Studio
If your network is stable but your YouTube live stream keeps buffering, your OBS Studio settings are likely misconfigured. YouTube's ingest servers are highly specific about how they want to receive data. If you send variable data rates or incorrect keyframe intervals, YouTube will struggle to transcode your video, resulting in infinite loading circles for your viewers.
Always run OBS Studio as an Administrator. In Windows 11/12, this tells the operating system to prioritize OBS for GPU and CPU resources over background tasks.
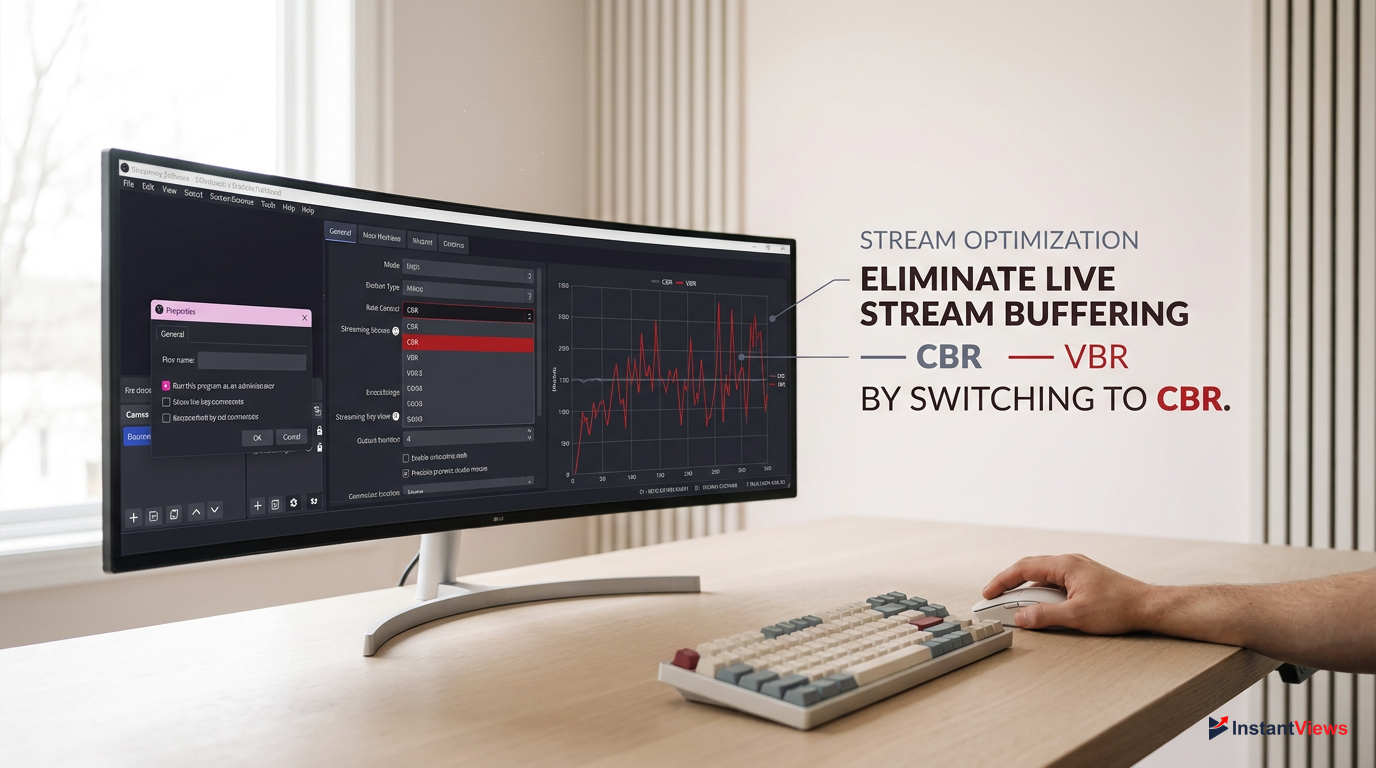
The most critical setting is your Rate Control. You must use CBR (Constant Bitrate). VBR (Variable Bitrate) might save bandwidth for recorded videos, but for live streaming, it causes massive data spikes during high-motion scenes. When these spikes exceed your upload capacity, the stream drops frames instantly.
- Maintains a steady data flow to YouTube
- Prevents sudden upload spikes
- Required by YouTube's official streaming guidelines
- Causes buffering during fast camera movement
- High risk of dropped network frames
- Not supported well by RTMP ingest servers
Additionally, your bitrate must match your resolution, and your keyframe interval must be set to exactly 2 seconds. Leaving the keyframe interval on '0' (Auto) is a common mistake that forces YouTube to guess when to refresh the image, causing desync and lag. Follow these exact steps to lock in the perfect 2026 OBS settings for YouTube.
Access Output Settings
Open OBS Studio, click 'Settings' in the bottom right, and navigate to the 'Output' tab on the left sidebar. Change the Output Mode from 'Simple' to 'Advanced'.
Set Rate Control and Bitrate
Under the Streaming tab, ensure Rate Control is set to 'CBR'. Set your Bitrate to 6000 Kbps (for 1080p60fps) or 4500 Kbps (for 1080p30fps). Never exceed 80% of your total upload speed.
Lock the Keyframe Interval
Find the 'Keyframe Interval (0=auto)' setting and type '2' into the box. Set the Profile to 'High' and click Apply.
4. Adjusting Resolution and Framerate for Stability
A harsh reality of live streaming is that pushing a 4K or even 1440p signal is often a waste of bandwidth that actively harms your stream's stability. If your YouTube live stream keeps buffering, you are likely trying to push a resolution and framerate that your internet connection simply cannot support. Downgrading your output resolution is the fastest way to eliminate network-based buffering.
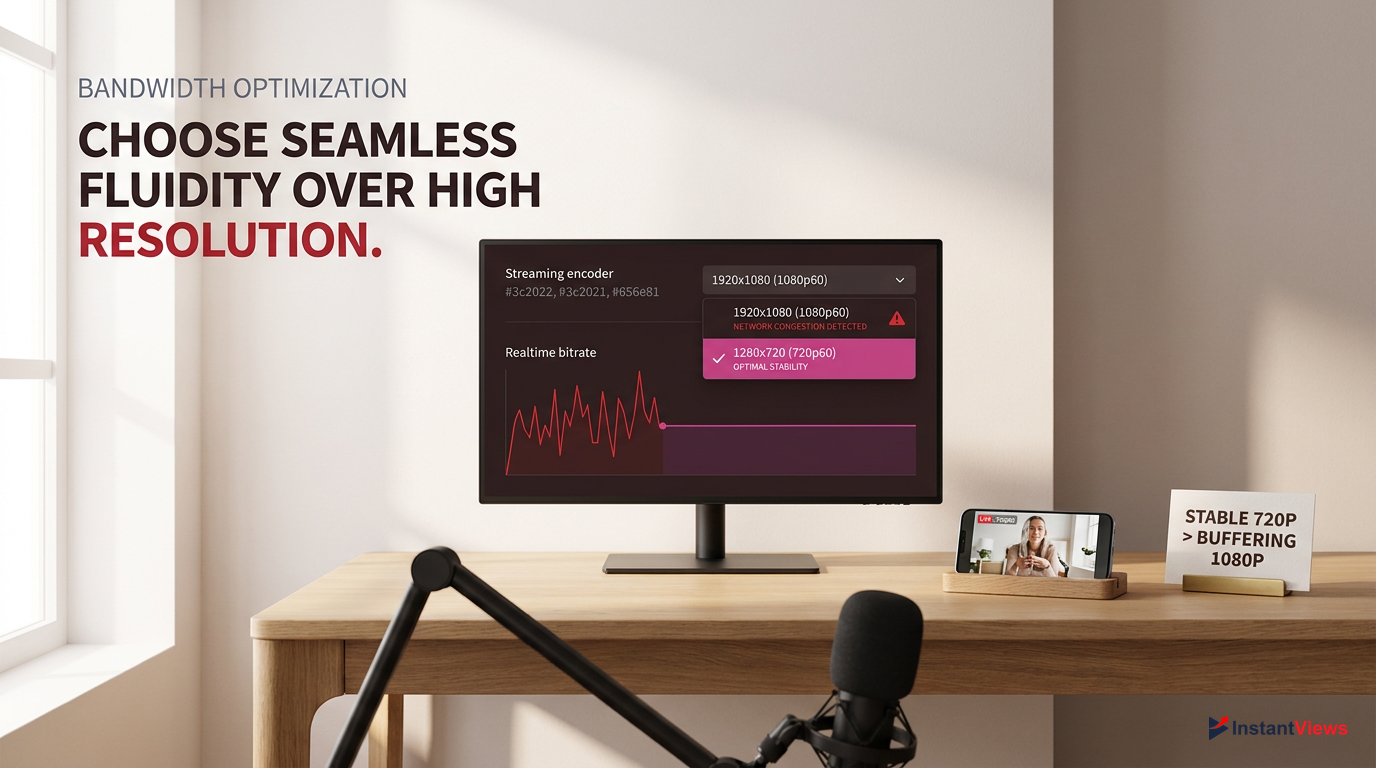
In 2026, over 75% of YouTube Live viewership occurs on mobile devices. A crisp, stable 720p60 stream looks vastly superior on a phone screen than a pixelated, buffering 1080p stream.
When you lower your resolution, you exponentially decrease the amount of data your encoder has to process and your network has to upload. For example, 1080p at 60fps requires roughly twice the bitrate of 720p at 60fps to look good. If you only have 5 Mbps of stable upload speed, trying to stream at 1080p will result in a blocky mess that constantly freezes.
| Resolution & FPS | Recommended Bitrate | Min. Upload Speed Required |
|---|---|---|
| 1080p @ 60fps | 6,000 - 9,000 Kbps | 12 Mbps Stable |
| 1080p @ 30fps | 4,500 - 6,000 Kbps | 8 Mbps Stable |
| 720p @ 60fps | 4,000 - 6,000 Kbps | 7 Mbps Stable |
| 720p @ 30fps | 2,500 - 4,000 Kbps | 5 Mbps Stable |
If you need to downscale your stream to stop the buffering, do not just change the bitrate. You must change the actual output resolution in OBS so the encoder doesn't waste resources rendering invisible pixels. Here is how to properly downscale your stream for maximum stability without sacrificing too much visual fidelity.
When downscaling from a 1080p canvas to a 720p output, always change the 'Downscale Filter' in the Video tab to 'Lanczos (Sharpened scaling, 36 samples)'. This keeps text and UI elements crisp.
To make this change, go to OBS Settings > Video. Leave your 'Base (Canvas) Resolution' at your monitor's native size (e.g., 1920x1080). Change the 'Output (Scaled) Resolution' to 1280x720. Finally, adjust the 'Common FPS Values' from 60 to 30 if you are playing slow-paced games, chatting, or doing a podcast. This cuts your required bandwidth in half instantly.
5. Hardware Acceleration and CPU/GPU Overload
Sometimes your internet is perfectly fine, but your YouTube live stream keeps buffering because your computer is choking on the workload. Encoding video in real-time is incredibly demanding. If you are using software encoding (x264), your CPU is doing all the heavy lifting. If your CPU hits 100% utilization, OBS will fail to generate frames, resulting in a 'laggy' stream that looks exactly like network buffering to your viewers.
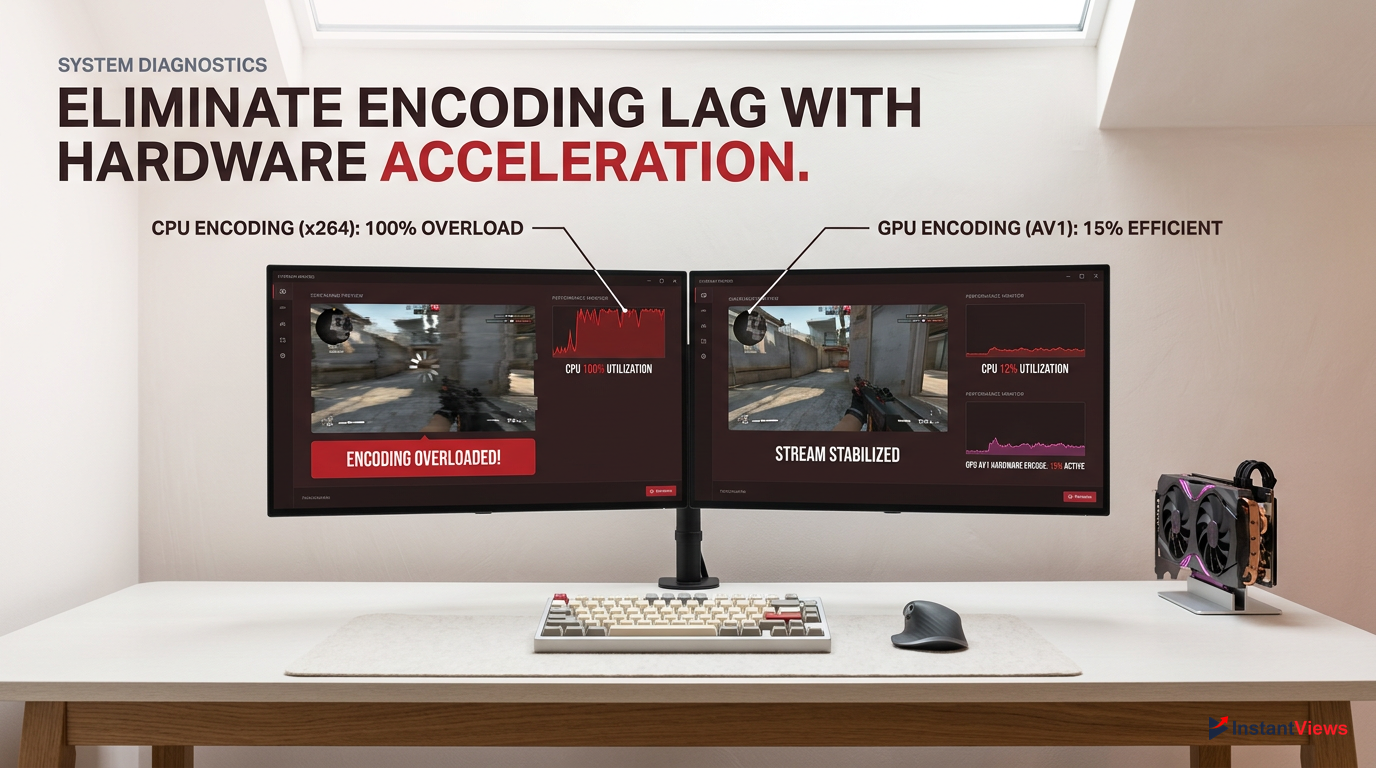
If you see the 'Encoding Overloaded! Consider turning down video settings' message in the bottom left of OBS, your viewers are currently experiencing severe buffering and stuttering.
The solution in 2026 is to always use hardware encoding. Modern graphics cards have dedicated chips built specifically for video encoding that do not impact your gaming performance. NVIDIA's NVENC (especially the AV1 encoders on 40-series and 50-series cards) and AMD's AMF are vastly superior to CPU encoding for 99% of creators.
- High CPU usage
- Prone to overloading
- Causes system-wide lag
- Dedicated GPU chip
- Zero gaming performance hit
- Incredibly stable framerates
If you are experiencing hardware bottlenecks, you need to shift the encoding burden away from your CPU. Furthermore, you must ensure that OBS has enough GPU headroom to composite your scenes. If your game is using 100% of your GPU, OBS will lag. Cap your in-game framerate to free up 5-10% of your GPU for OBS.
Switch to Hardware Encoding
In OBS Settings > Output > Streaming, click the 'Video Encoder' dropdown. Select 'NVIDIA NVENC H.264' or 'NVIDIA NVENC AV1' (if supported by YouTube and your GPU). AMD users should select 'AMD HW H.264'.
Adjust Encoder Presets
Scroll down to the Encoder Settings. Change the Preset from 'P7 (Slowest)' to 'P5 (Slow)' or 'P4 (Medium)'. Set Tuning to 'High Quality' and Multipass Mode to 'Single Pass' to reduce GPU load.
Cap In-Game Framerates
Open your game's video settings or use the NVIDIA Control Panel. Set a Max Frame Rate limit (e.g., 120fps or 144fps) so your GPU is never sitting at 100% utilization.
6. YouTube Live Control Room Settings
Many creators spend hours tweaking OBS only to realize the reason their YouTube live stream keeps buffering is due to their settings on YouTube's end. The YouTube Live Control Room offers three latency options: Normal, Low, and Ultra-Low. While Ultra-Low latency is amazing for real-time chat interaction (bringing delay down to 1-2 seconds), it completely removes the safety net for your viewers.
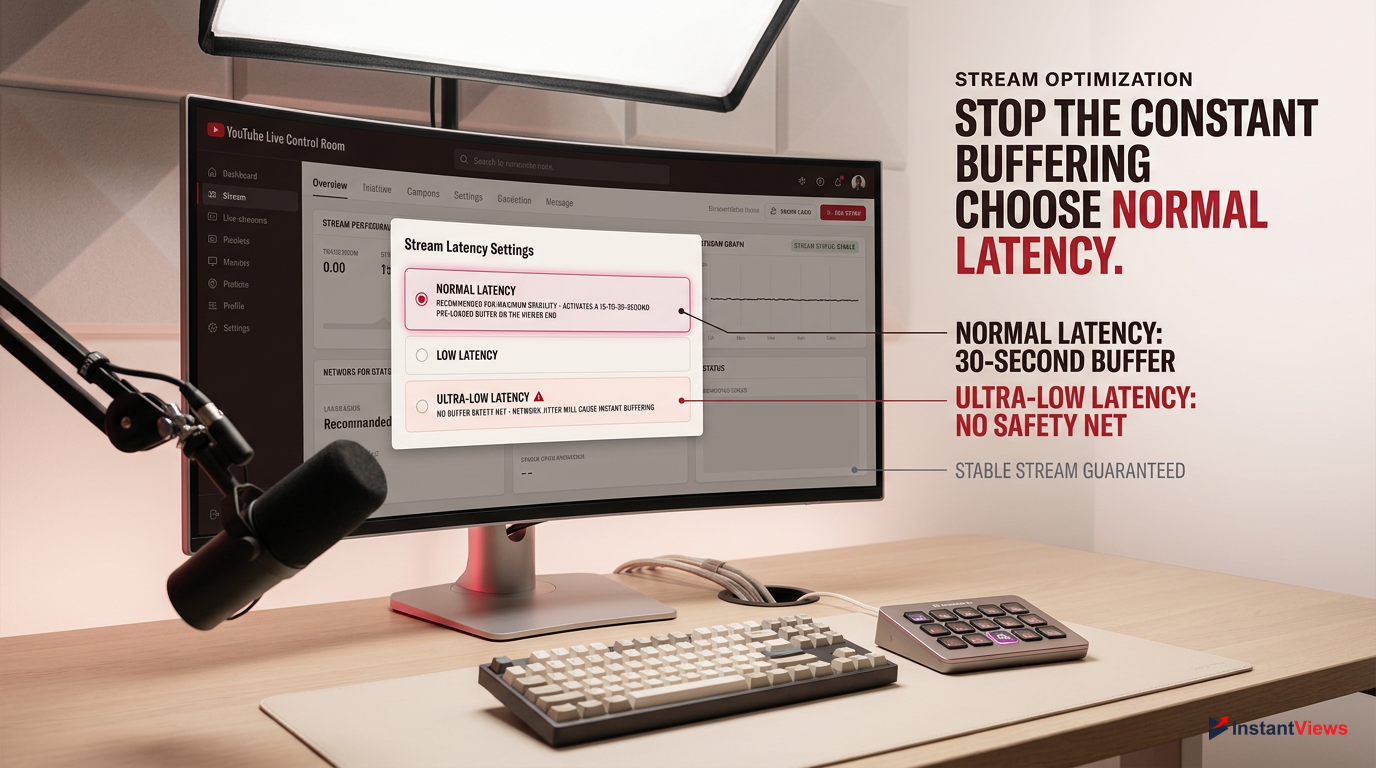
Normal latency forces the viewer's video player to download 15-30 seconds of your stream in advance. If your internet drops for 5 seconds, the viewer never notices because they are watching the pre-loaded buffer.
If your upload connection has any jitter, using Ultra-Low latency guarantees your viewers will experience buffering. Because there is no buffer built up on the viewer's end, the moment a packet of data is delayed from your PC, their video player freezes. If stability is your goal, you must step up to a higher latency tier.
- Highest possible stream stability
- Supports 1440p and 4K resolutions
- Completely eliminates minor network stutters
- Highly susceptible to viewer buffering
- Requires a flawless, gigabit fiber connection
- Caps resolution support at 1080p
Additionally, enabling the DVR feature (which allows viewers to rewind the live stream) can sometimes cause playback glitches for viewers on older devices or slower connections. If you are troubleshooting aggressive buffering, it is best to optimize the Control Room settings specifically for stability over interaction.
Access Stream Settings
Go to YouTube Studio, click 'Create', and select 'Go Live'. In the Live Control Room, look at the bottom left panel under the 'Stream Settings' tab.
Change Stream Latency
Locate the 'Stream Latency' section. If it is set to 'Ultra-low latency', change it to 'Low latency' or 'Normal latency'. Note: You cannot change this setting once the stream has started.
Monitor Stream Health
During your broadcast, keep the 'Stream Health' tab open in the Control Room. If the status drops from Green (Excellent) to Yellow (Good) or Red (Poor), YouTube will tell you exactly if it's a bitrate or keyframe issue.
7. Clearing Cache and Background App Interference
A frequently overlooked reason why a YouTube live stream keeps buffering is background application interference. In 2026, web browsers, chat applications, and cloud syncing services are incredibly resource-hungry. If Google Chrome is eating 8GB of RAM and hardware accelerating 15 tabs in the background, your streaming software will be starved for resources, leading to dropped frames.
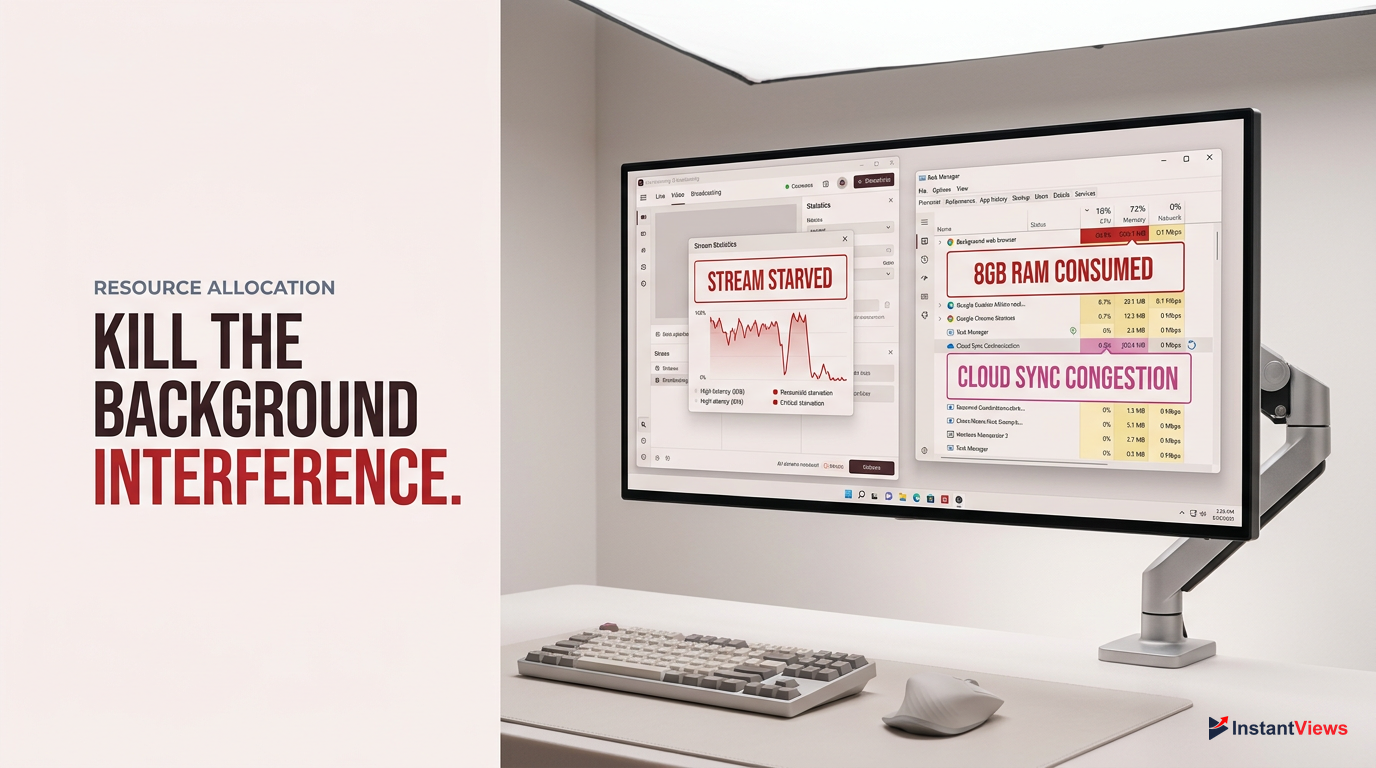
Cloud storage apps like Microsoft OneDrive, Google Drive, or Dropbox are notorious stream killers. They are designed to detect new files and immediately upload them to the cloud. If you save a clip, or if a game autosaves to your Documents folder, OneDrive will instantly monopolize your upload bandwidth to sync that file, causing an immediate, massive lag spike for your viewers.
- Close all unnecessary browser tabs (especially those playing video)
- Pause OneDrive, Google Drive, and Dropbox syncing
- Disable Windows Update Delivery Optimization (P2P updates)
- Close background game launchers (Epic, EA, Ubisoft Connect)
- Disable Hardware Acceleration in Discord and Spotify
Discord is another common culprit. By default, Discord uses hardware acceleration to render its UI, stealing precious GPU cycles from OBS. Furthermore, if you are screen sharing in a Discord call while streaming to YouTube, you are encoding your screen twice, doubling the strain on your system. Follow these steps to neutralize background interference.
Disable Discord Hardware Acceleration
Open Discord, click the User Settings gear icon. Scroll down to 'Advanced' under App Settings. Toggle off 'Hardware Acceleration' and restart Discord.
Pause Cloud Syncing
Click the OneDrive cloud icon in your Windows system tray. Click the gear icon (Help & Settings), select 'Pause syncing', and choose '8 hours' or '24 hours'.
Turn Off Windows Background Updates
Go to Windows Settings > Windows Update > Advanced Options > Delivery Optimization. Toggle off 'Allow downloads from other PCs' to prevent Windows from using your upload bandwidth.
8. Fixing Network Drops with YouTube's Backup Stream Feature
If you have exhausted all local network fixes and your YouTube live stream keeps buffering due to unavoidable ISP routing issues, you need redundancy. Professional broadcasts do not rely on a single connection. YouTube provides a powerful, built-in feature for this exact scenario: the Backup Ingest Server. If your primary connection drops a packet, YouTube instantly pulls the missing data from the backup stream.
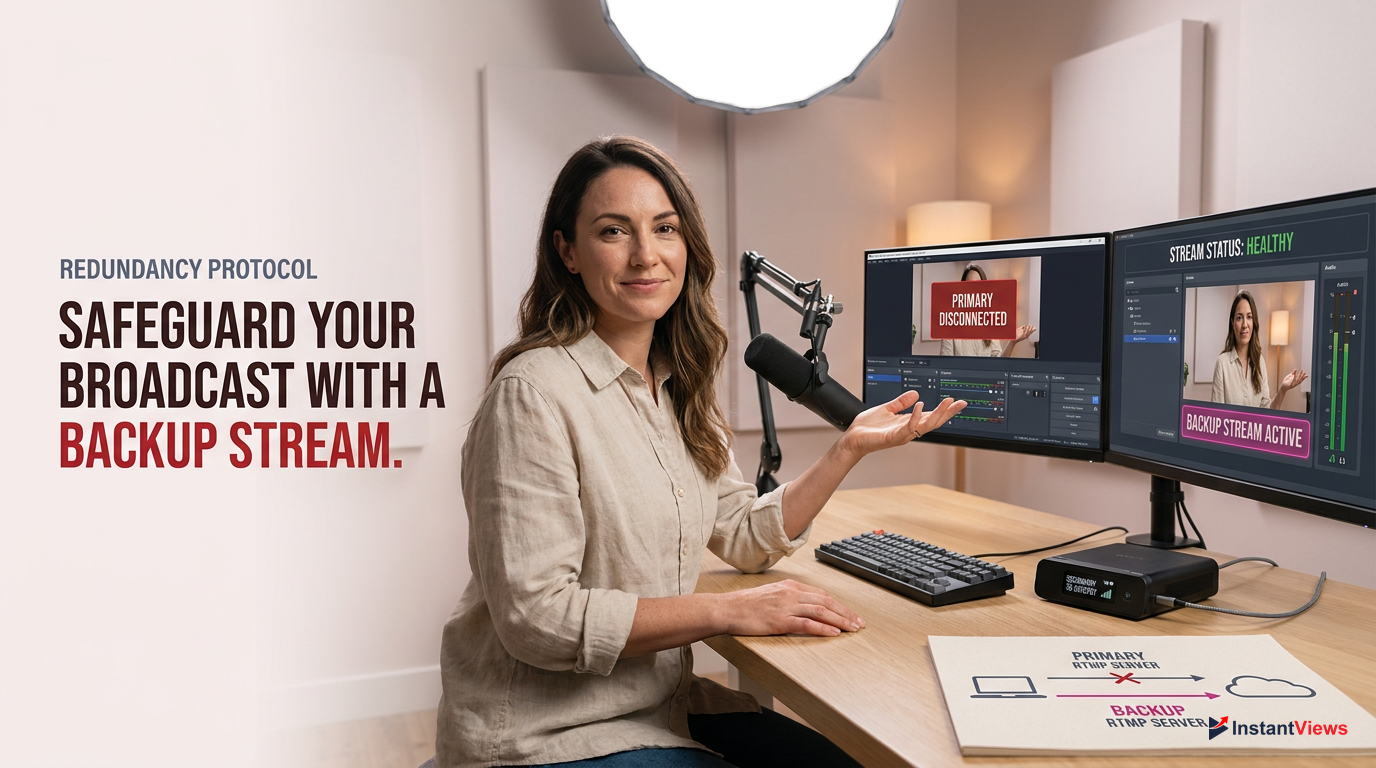
You can use the Backup Server feature on a single PC by running a second instance of OBS, but it is most effective when used with a dual-PC setup or a secondary internet connection (like a 5G hotspot).
To utilize this, you send two identical streams to YouTube simultaneously. The primary stream goes to the main RTMP URL, and the secondary stream goes to the backup RTMP URL. If your main ISP has a momentary hiccup, the viewer experiences zero buffering because YouTube seamlessly switches to the backup ingest. For creators suffering from random, unexplainable ISP throttling, this is a lifesaver.
Speedify Bonding
A software solution that bonds your Ethernet and a 5G tethered phone together. If Ethernet drops, it instantly fails over to 5G, preventing stream buffering.
Dual OBS Instances
Running OBS twice on one PC (using a portable installation). Instance 1 streams to Primary URL, Instance 2 streams to Backup URL. High resource cost, but high redundancy.
Setting up a backup stream requires configuring your encoder to target the secondary URL provided in the YouTube Live Control Room. This is an advanced technique, but it is the ultimate safeguard against dropped frames and buffering.
Locate the Backup URL
In the YouTube Live Control Room, under Stream Settings, look below your Stream Key. You will see 'Backup server URL' (usually ending in backup.youtube.com).
Configure the Second Encoder
On your secondary streaming device (or second OBS instance), go to Settings > Stream. Set the Service to 'Custom'. Paste the Backup server URL and your identical Stream Key.
Start Simultaneous Streams
Hit 'Start Streaming' on your primary encoder, wait 5 seconds, then hit 'Start Streaming' on your backup encoder. YouTube will automatically sync the two feeds.
9. Upgrading Your Gear for 2026 Streaming Standards
If you are still using the cheap combo modem/router provided by your ISP in 2026, it is no wonder your YouTube live stream keeps buffering. Streaming at modern bitrates (especially if you are pushing 1440p or AV1 codecs) requires serious networking hardware. ISP routers are notorious for overheating, suffering from bufferbloat, and failing to route heavy, sustained RTMP traffic efficiently.
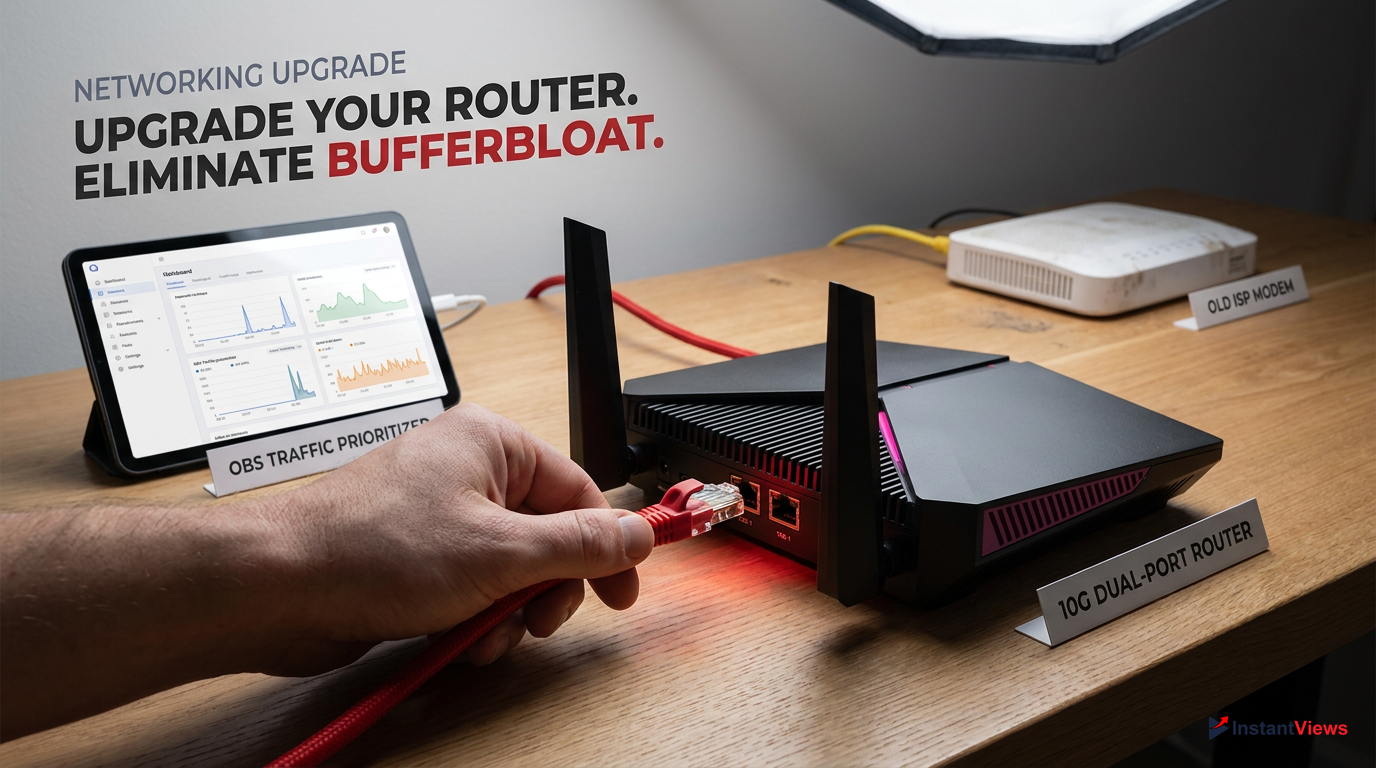
The gold standard router for 2026 live streaming, completely eliminating bufferbloat.
- Dual 10G Multi-Gig ports for zero-bottleneck Ethernet
- Advanced Adaptive QoS prioritizes OBS traffic automatically
- Premium price point
- Overkill if you only have a sub-100Mbps internet plan
Upgrading your networking gear is an investment in your channel's retention rate. You need a router that supports at least a 2.5G WAN port to handle modern DOCSIS 4.0 or Fiber connections, and robust Quality of Service (QoS) rules. Furthermore, if you capture console gameplay, an outdated capture card might be bottlenecking your USB bandwidth, causing desyncs that look like buffering.
When shopping for stream-ready hardware in 2026, do not just look at raw speed. You are looking for stability features. A router with a powerful quad-core processor will handle thousands of simultaneous connections (like gaming, streaming, and background apps) without dropping a single packet of your YouTube video feed.
10. Advanced Fixes: DNS Flushing, VPNs, and ISP Routing
When all else fails, and your YouTube live stream keeps buffering despite perfect hardware and OBS settings, the problem lies deep within your ISP's routing tables. Sometimes, your ISP takes a highly inefficient route to connect to YouTube's ingest servers, causing massive ping spikes and packet loss along the way. In these cases, you need to force a new connection route.
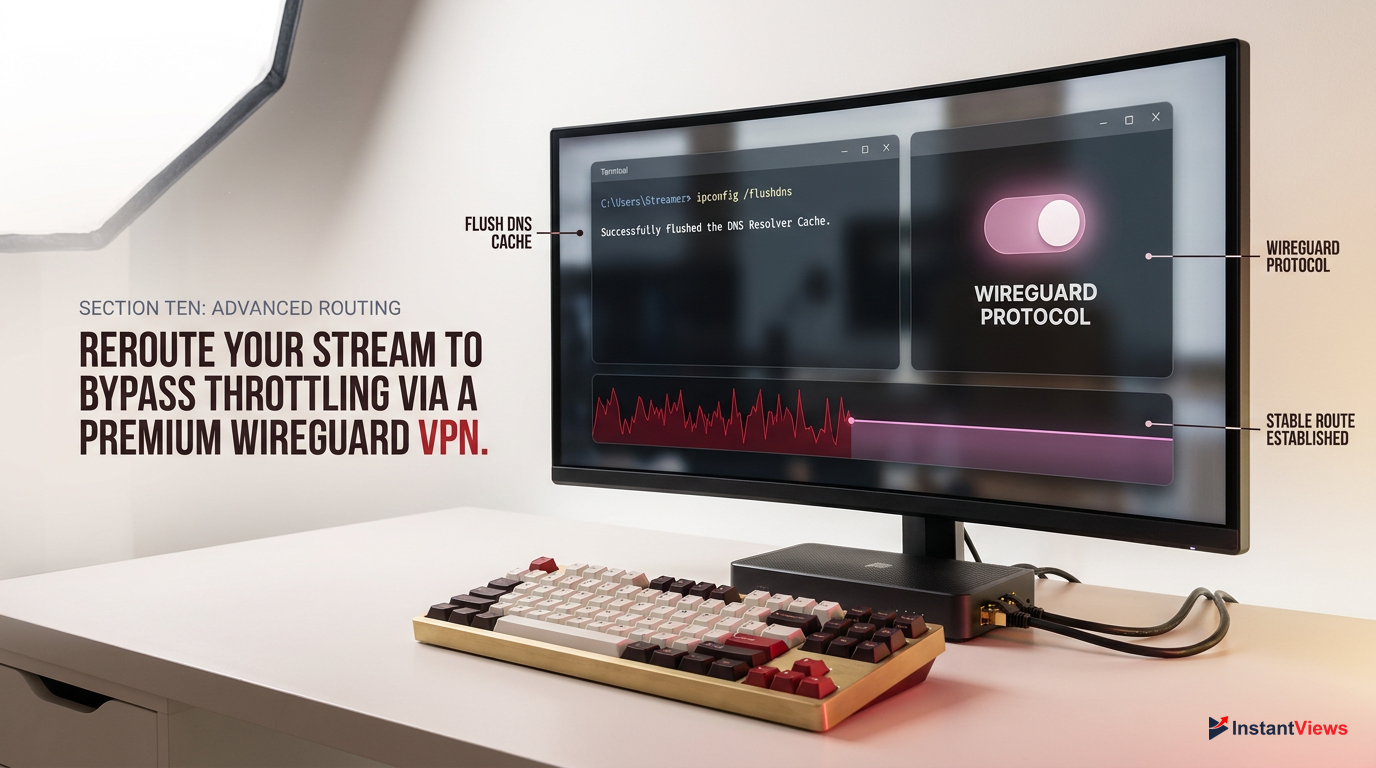
Do not use a free VPN for live streaming. They lack the bandwidth and will cause 10x more buffering. If you must use a VPN to bypass ISP throttling, use a premium service with the WireGuard protocol.
The first step is to flush your DNS cache. If your computer is holding onto an outdated or congested IP address for YouTube's servers, flushing the DNS forces it to find a fresh, faster route. Additionally, changing your default DNS from your ISP's slow servers to a public, high-speed DNS like Cloudflare (1.1.1.1) or Google (8.8.8.8) can resolve handshake delays that cause stream drops.
Some ISPs actively throttle RTMP traffic (live streaming data) during peak evening hours to save bandwidth. A premium VPN encrypts your traffic, hiding the fact that you are streaming, which bypasses this throttling.
If you suspect ISP routing is the culprit, run a trace route to `a.rtmp.youtube.com` to see exactly where the connection is timing out. If it's timing out outside of your home network, apply these advanced network resets to force a cleaner connection.
Flush Your DNS via Command Prompt
Click the Windows Start button, type 'cmd', right-click Command Prompt, and select 'Run as administrator'. Type exactly: ipconfig /flushdns and press Enter.
Change Your DNS Servers
Go to Windows Network Connections, right-click your Ethernet adapter, select Properties. Double-click 'Internet Protocol Version 4 (TCP/IPv4)'. Select 'Use the following DNS server addresses'. Enter 1.1.1.1 for Preferred and 1.0.0.1 for Alternate.
Test a WireGuard VPN Protocol
If throttling persists, connect to a premium VPN using the WireGuard protocol (which has minimal speed overhead). Connect to a server closest to your physical location, then start your stream.
Frequently Asked Questions
This usually means you are using Ultra-Low Latency in the YouTube Control Room, or your bitrate is fluctuating too much (VBR). OBS may show zero dropped frames because it successfully sent the data, but the viewer's internet cannot download the sudden spikes in bitrate fast enough.
For a stable 1080p 60fps stream in 2026, a Constant Bitrate (CBR) of 6,000 to 9,000 Kbps is ideal. Ensure your upload speed is at least 12 Mbps stable to support this without causing network congestion or buffering.
Yes. If you use software encoding (x264) and your CPU hits 100% usage, OBS cannot encode the video frames in time. This results in 'Encoding Overloaded' errors, which translates to freezing and buffering on the viewer's end. Switch to hardware encoding (NVENC/AV1).
A 'Poor' stream health warning means YouTube is not receiving enough data. Lower your OBS bitrate, change your keyframe interval to 2, ensure you are using a wired Ethernet connection, and verify no background apps (like OneDrive) are stealing your upload bandwidth.
While Wi-Fi 7 is vastly faster than previous generations, it is still susceptible to wireless interference and micro-stutters. For live streaming, where a continuous RTMP data flow is required, a hardwired Cat6 Ethernet connection remains the only way to guarantee zero packet loss.
This happens if you are using Variable Bitrate (VBR) instead of Constant Bitrate (CBR). Fast movement requires more data to render the changing pixels. If using VBR, the bitrate spikes dramatically during movement, overwhelming your upload connection and causing buffering.
If your stream keeps buffering, switch to Normal latency. Normal latency builds a 15-30 second buffer on the viewer's end, meaning minor network drops on your end won't cause their video to freeze. Ultra-low latency offers real-time chat but zero buffering protection.
Yes, absolutely. Dropping your output resolution from 1080p to 720p drastically reduces the amount of data your network needs to upload and your GPU needs to encode. This is the fastest way to stabilize a stream on a weak internet connection.
A keyframe is a full image frame sent to YouTube. YouTube requires a keyframe interval of exactly 2 seconds to properly transcode and deliver your video. If set to 0 (Auto) in OBS, the irregular keyframes will confuse YouTube's servers and cause viewer buffering.
Yes, many ISPs throttle heavy, sustained upload traffic (like RTMP live streaming) during peak evening hours to manage network congestion. If your speed tests are fine but your stream drops frames every night at 8 PM, a premium VPN might bypass the throttling.


